Sunday, September 5, 2010

BurdaStyle Cowl Top

This was a quick and dirty cowl neck top from the free pattern on BurdaStyle available here. I graded up to about a 38 on the waist and hips, and obviously could stand to use a bit more! It's an easy pattern. I did finish the sleeves by serging, then folding over once and stitching at 1/4 inch. For the back neck I used Amanda's excellent tutorial for finishing with bias tape available here. It gives a lovely finished and professional look, that will not stretch out. The only thing I would add is that I had to use my walking foot, as the regular one pulled the thin rayon too much. It probably wouldn't be necessary with a more stable knit. And I finally figured out out to do an adequate twin needle stich for the hem without the threads twisting and breaking!

Saturday, July 17, 2010

Vogue 1183 - Kay Unger Dress


The plan was to make a wool tweed dress that was professional enough for work, but not too dull - the Kay Unger dress was perfect for this. It is rated as an easy pattern, but with 12+12 pieces, there is no instant gratification! It is certainly doable by beginners, it just takes some time and patience to line up all of the pieces and do all of the top stitching. It is well worth the effort in the end! I used a silk/wool tweed from gorgeous fabrics. It was my first gorgeous fabrics order, and I think I'm addicted!

I made a few modifications - you can see the pattern alterations below.
1) SBA - I trimmed the curve on piece #2, as well as shaved off about 3/8 inch from the bottom of the side bodice piece as well (see red arrow). Then I had to pinch an equal amount out of the midriff so everything would line up.
2) The neck line initially gaped, so I also pinched out almost 1/2 inch from the neck line ending near the bust point (see fold on piece #1).
3) I also took out 1/2 inch on each side of the zipper tapering to mid-back.
4) I pinched 1/4 inch from the side seams so the arm hole didn't gape. It sounds like I was gaping everywhere!
5) Shorten hem by 1 inch to bring above the knee.
6) Add interfacing to the midriff.

I think that is it. After all of the cropping, maybe I could have started with a smaller size! I started with a size 10 for the bodice, and transitioned to a 12 in the midriff. For some reason my muslin ended up being a little small in the hips, so I initially added a little fabric in there, but ended up taking it out in the end.

Overall I am quite happy with it - the muslin was an absolutely essential step in the process. I'm jealous of people who fit straight sizes! My only major issue is the large front skirt darts - I would be happier if this part was flat, but I was too lazy to change this as well. I could probably have tapered to a size 12 a little lower down than I did too - I have a little too much ease in the belly. Luckily I mostly wear it with a white coat over it so no one will notice! The instructions were fine - I was a bit perplexed by the skirt flap in the back, but just made something up as I had never done this before.

Sunday, June 20, 2010

Vogue 1027 Dress - X2

The first is definitely an approximation of Vogue 1027 - I made it more of an empire waist, dropped the tie, and didn't do a circle skirt. I used a lightweight cotton knit from the $3/yard table that I picked up in SF. I should have bought more! I made an SBA on the front pattern pieces by pinching out one of the darts, and taking about 1/3 inch folded off vertically in the center of the front bodice piece. I constructed the back with a CB seam, and used another knit dress pattern that had a swayback adjustment. I used the lightweight steam a seam at the neck line to ensure I didn't get any stretching. A bit of elastic would probably be nice, but I didn't have any. I constructed the sleeves as instructed, which isn't beautiful on the inside, but looks fine on the outside. For the hem I just turned it up 1/4 inch and folded twice, because I didn't want to make it any shorter than this, and I ran out of fabric!

(will post picture soon!)

The second is the real thing. I used a silky rayon jersey from Gorgeous Fabrics, which has a weight and feel closer to silk jersey than your average rayon knit. It also has a little bit of sheen which makes it a little dressier. I like the feel of it, but it's much harder to work with than normal rayon jersey! If you cut your skirt on the grain, it only takes 2 yards to complete it. I cut a size 8 and ended up having to take the side seams in some. The only major change I used from the pattern is that I self lined the upper bodice. This gave a little more substantial bodice to hang the circle skirt off of - important because the fabric has some weight to it! It also meant that I didn't have to hem the neck and sleeves . I did end up top stitching them though. I took 4 inches off of the skirt when I cut it, and it still hits below the knee. I used Assorted Notions recommendations for the tie. I also ended up hand stitching the rest of it to the bodice, because otherwise the knot would slip down and show the seam which looked kind of odd. If your fabric wasn't so slinky, it would probably just stay in place with a knot. Here is a pic (sorry, I obviously can't be bothered to iron for ya'll!):


Sunday, May 9, 2010

Jalie 2911 - take 2

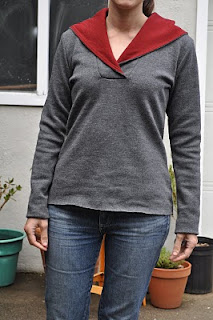
I've clearly been on a Jalie kick - maybe I'll get the courage up to make the jeans soon, that's the only one I haven't tried yet. I finally found a use for that oh-so-thick and non-stretchy Vera Wang Lavendar Collection grey wool jersey from Fabric.com - another on-line semi-bust! It worked out well for this. I made the Jalie top with the hood. My first version was a thick wool jersey with the collar, and looks terrible, so we won't discuss it here! Because it was so thick, I decided to do a contrast for the inside of the hood, and chose a Denverfabrics very lightweight red wool jersey. This was the only alteration I made to the pattern - you have to just add a 1/4" seam allowance to the hood piece, and cut 4 of them. I sewed the two contrasting pieces together, then proceeded with the instructions as given. Now if only I had remembered to pre-wash the fabric first! Will hem after throwing it through a cold wash, and see how much damage is done. I'm enjoying it until then....


Sunday, March 14, 2010

Jalie 2682 - take 3

Quick, easy to put together, interesting construction for the front, looks fabulous on everyone I've seen it on. My only complaint is the number of back pieces - I'm just not quite sure why it needs so many, so I got rid of them on the last try.

I did the first one in a drab brown wool jersey from denverfabrics. I need to stop ordering fabrics from them because nearly every time I am disappointed - either it is a different thickness than I expect, the color is off, or something. I do much better from Fabric.com or obviously in person, although Sacramento isn't abounding with fabric store options. Somehow it was a different color in my head. It is however a nice thickness and quite warm. I did try the Jalie non-serger method of zig-zag stitching the edges, then stretching the fabric and doing a straight stitch. I finds the fabric gets a little stretched out with this method and doesn't lie flat. For the Jalie patterns I've found that using my 1/4" quilting foot with a straight stretch stitch to make a nice even line (can I say I *love* the 1/4" seam allowances?), followed by a zig zag using the Janome overlock foot (not sure what it should be called, but keeps the fabric in place for sewing to the edge of the fabric) works well. I seriously need a serger. Otherwise the shirts came together exactly as described in the instructions. Again I used an R and graded to a T at the hips. I had to take off nearly 2 inches total from the sleeves in the end to make them narrower, and I took a smidge off of the side bodice just below the chest to make it more fitted.

The second one is a lovely thin black knit remnant from a store in Portland. I'm not sure what it is made of - perhaps a cotton/wool blend. For the sleeves I just folded over 1/4" once and did a straight stretch stitch.

The third one, and the only one with a picture right now, is a purple wool/rayon jersey from Discount Fabrics in SF. I somehow thought I did the first one with a yard of fabric, but obviously not because it took a whole lot of jigsaw puzzle-ing to make it work! The fabric is cut at 90 degrees to the grain rather than on the grain, but it's hard to tell. Same steps as above, except had to do narrow cuffs for the sleeves (not enough fabric) and cut the back out as one piece, and I am much happier about it! Not to mention a time-saver.

Here is the front:


Here is the back. I could definitely use a swayback...

Jalie 2793 Dress

I finally broke down and bought some Jalie patterns - from their 4 for the price of 3 sale (I think it's an ongoing sort of thing). I'm used to buying big 4 patterns on sale at Joann's, so they still seemed quite expensive. As everyone has been saying, they are fabulous! I love having actual paper to cut out. There instructions are brief, but clear with good pictures. There construction of pieces makes so much more sense than big 4 pattern construction. Highly recommended!

I made the Jalie 2793 tunic into a dress.I used a rayon/poly/lycra blend from Fabric.com. I usually don't like poly jersyes, but the rayon seems to save it. The contrast is the leftover red rayon jersey from my previous dress. I used a size R and graded to a size T at the hips. I lengthened it by about 11 inches to make a dress. As you can see below, I initially put in the modesty panel since everyone seemed to say it was necessary, however it looked terrible with the red for some reason. Since I have no cleavage to expose, I think it works just fine without it. The only other change I made is skip the top stitching. Instead I edge stitched the v-neck seam to the back facing before turning over and ironing. It came together easily in a day, and fits perfectly without alteration (it is jersey afterall).

Here are some pics:


Here is the inside of the neck with the stitching and cut out modesty panel:

Sunday, January 17, 2010

A Plus A-Line Skirt

I've never used a pattern to make a skirt before, so I'm not sure why I decided it was a good idea to use one that I had to print out 51 pages for! It's available on Burdastyle here. I think it turned out pretty well. The printing *is* a hassle, and Wenlan's patterns give you the whole piece not a half piece with a fold line, which means twice as many pages to print and piece together. It's okay if you have a good movie to watch. I used a cotton-mystery fabric blend from the stash. Her directions are adequate, although not particularly detailed. I followed them pretty much exactly. It fit to size, although I wanted it to sit a little lower on my waist, so I added 1/8th inch to the yoke pattern pieces. I did put the top stitching at 1/8th inch rather than 1cm or so as suggested. I used a blind-hem stich for the hem.

Not my best inside work, but will do:
Here's the zipper on the inside. I usually machine sew not slip stitch as recommended. It works except is a little wonky at the bottom.


Somehow the yoke seams line up better on the zipper side than the right side! I should put in a hook and eye: